
Orienteering Hutt Valley Inc.
Navigation Advice
OHV's "Brownie" MTBO events use flat land alongside the Hutt River. The navigation is designed to be easy, but when you are new there are lots of things to learn. Michael Wood talks us round a short and longer course, pointing out the things he would be looking for.
Note Apr 2012: NZ has recently adopted some new mapping conventions. You are now allowed to travel off-track where the map shows bright yellow (open land) or white (forest). Green line "allowable routes" are still in but will probably be used less. The example below is therefore a bit out of date but still has a lot of good advice.
Short Course Example
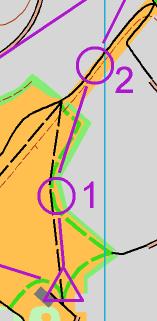 The triangle is always used as the start in orienteering. It's on the map, and sometimes on the ground. If not a triangle there will be some other indication of where to start. This one is near a building (the rectangle) and on a thin dashed black line. This represents a narrow "single-track". It leads all the way to the first control, so all you have to do is follow it.
The track goes across yellow, which means open land such as a park or paddock. However you aren't allowed to go just anywhere across the park. The rules of the game say you have to stick to tracks. Or "virtual tracks" which are green lines on the map. There's a green line around the edge of the park which you could use, but it's longer than the black line. Away we go.
From #1 to #2 is a bit harder. The single track carries on to a junction. From over your left shoulder there's another track like the one you're on, and also a thin solid line. This is a maintained track, perhaps gravel or seal. The one that leads to #2 goes forward, in the "one o'clock direction" from where you are now. The yellow has narrowed down now with gray on either side. This is used by OHV to represent "unmapped, probably because it is private". In this case it is houses with a walkway between. Away we go.
 Look now at the second snippet of map on the right. The path we're on comes to an unusual Tee junction, one with two legs! We have to go left at the Tee. We've got "unmapped" on the left and yellow (grass) on the right. There's another junction very soon - on the left. That's where the control is.
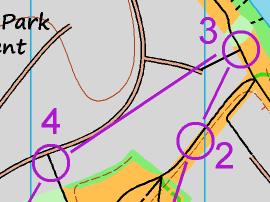
3-4 is a bit longer. We take the left where #3 is and pretty soon it changes to a double line with brown between. This is a two-way road. We're going to follow the road to a Tee, go left at the Tee, and then look for a narrow maintained path on the left.
A narrow path can be hard to see when you're on a road - here's a hint. The road distance after the Tee is double the road distance before the Tee. Hope this helps. The control point is just into the narrow path.
 Now onto the third piece of map, on the left. Actually its much easier if you can turn the map upside down at this point, to match the way we are going. The experts use a mapboard on their handlebars which has a pivot so they can do this. If you're using a simple board cable-tied to your bars, it is worth unclipping your map and putting it back in upside down.
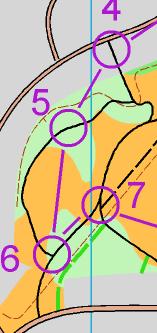
Now its easy. We've gotta go along the thin track from #4 and take the first right, also a thin track. The green on the map means we're going to be mostly in trees. Wheee! Did you enjoy the downhill? Experts could tell this was coming by the brown line that you crossed, with the little tag indicating which way is down.
#6, hope it's getting easier:-)) Carry on from 5, for a start there's grass on our left, then there's grass on both sides, and then the Tee junction with the control.
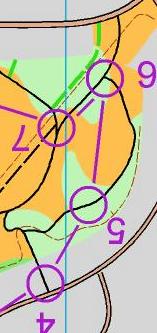
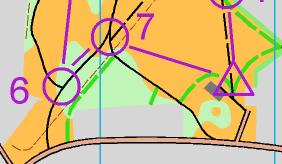 And the last picture, on the right. Left at the Tee (trees on both sides again). Next control is a 4-way junction, but the almost-straight-ahead is dashed - a lesser standard track compared to the others. Now back to the finish. Sometimes this is shown by a double circle but in this case its the same place as the start (the triangle). Now here's an interesting little situation. The black track goes to the road, we could use the little short side road and then the narrow track. But remember the green line? This lets us take a short-cut.
If you would like another exercise, print out the whole map and read on. But to really get the hang of this, you have to get out on your bike and do it. Find an event and turn up!
A Longer Course Example
This course starts with #10.
Actually, its the same as #2 on the last course:-)) On your way.
10-11 Become a Tree-Hugger
Proceed to the two-legged Tee. This time turn right. Pass a thin track which crosses the river - yes its a footbridge. We're going to have to take the left branch at a fork. Notice that one track hugs the gray (houses) and the other hugs the green (bush on the river's edge). The one we want goes down by the bush.
11-12 The Green Line
Now this is tricky. We have to get back on the other branch. There's a green line that lets us do it, but with green lines there's nothing on the ground to see. Don't worry, just do it soonish, you can't be marked down for it. Now our green line follows the edge of "Ngati Tama Park" into its corner. Can you make things fit?
12-13 U-Turns ARE Allowed!
There are two ways to do this, here's one. Back the way you've come! Yes it's entirely allowable! The reason I like it, is that once we get back to the river's edge (which we know) we can follow it closely all the way. Easy to think about. Fewer decisions to make. So back to the bush by the river's edge, turn right, and just hug that bush. Looks like there's a place where the track doesn't exist but there's a green line that lets us carry on. Then we have to cross a road where the river bends and find the thin track again in the trees. OK?
13-14 The Bounce-Back Technique
We're going to follw the thin track as far as it goes, after that hug the edge of the bush on the "virtual track". The trick here is: there are several little tracks going through the green to the river. Which one is the control on? Counting them is one option, but what if we miss one? Here's what I would do. Ride at high speed to the place where there are three tracks close together - hopefully hard to miss. Then come back to the right one. Extra distance, but time saved by not pussyfooting around.
14-15 Avoiding Danger!
We have to cross Awa Kairangi Park on the green line. Again its invisible but here's a secret. The mapper wouldn't put the route through the middle of a soccer pitch in case there's a game on! With this knowledge you can "spike" the narrow track through the houses on the other side of the park!
15-16 Choice Of Riding Surface
Another choice. I would take the thin path past the building, because a maintained path is always going to be easier riding than a virtual track on grass. The brown area is carpark, same colours as a road just fatter. We're allowed to ride onto the grass by the corner of the rectangular bit and along the bush edge.
16-17 Using an Attack Point
Another tricky one. You're not allowed on the red roads (this isn't a universal symbol, but it's neater than purple crosses.) But there's a thin black line (footpath) on the NE side of the bridge. This will get us across the river and onto the thick black line that leads almost to 17. Thick equals wide. Well not as wide as a two-way road, but wide enough for one vehicle. Hint for finding the right turnoff: the curvy blue dashed line is a watercourse. It's just after that. (This is called "an attack point".)
17-18 The Indistinct Junction
Back onto the one-vehicle road. An "attack point" for #18 would be the paved area (brown), plus two joins to the red road (SH2). However the actual turn-off is hard to see. I can tell that because the line doesn't quite meet. So (a) look carefully and (b) have a backup plan. The backup is that there's a second turnoff if we miss the first!
18-19 The Obstacle
Well this track beside the river is a bit rough (dashed) so we'd be better back on the solid line. However the first way out, and the second way out, both have obstacles that mean getting off the bike, probably a barrier to stop hoons. That's the meaning of the little purple bar. You're allowed there, it just costs you a bit of time. You'll have to weigh up the time against bumping further along to the third exit which doesn't have an obstacle.
Now you've got an exciting little narrow section before Te Haukaretu Park. There's a green line short-cut alongside the pond if you care to choose it, or the black route. Size it up when you get there.
19-20 A Catching Feature
Probably you'll see this track on the left because it's wide. But just in case, the yellow (playing field) on the right just afterwards can catch you and bounce you back. (The thin tracks just before are too miss-able to be good attack points.)
20-21 A Chain of Events
A few turns to make here so let's list them. Road to the bend with the building. Ahead into the oval paved area (carpark). Right onto the wide maintained track. Left onto the narrow maintained track. Proceed to control.
21-22 The Maze
The hardest control of the course. Take it easy. Be prepared to go beyond if it makes it easier. There are many routes; consider going back the way you approached 21, left into the wide track as far as the square paved area (carpark). Although there is an obstacle there, there's a thin track from a corner with only one turn to get you into the control. Alternatively carry on from 21, but you've got to use a chain of virtual and actual tracks to find your way. You may well end up riding any-old-how to the far side of the dark green and coming in from behind. This route may be faster but only for experts!
22-23 Time for a Swim
Good attack point for this one - the pond with a circular fence round it (thin line with little ticks). You can get there via the carpark. Hug the outside of the fence to follow the virtual track.
23-24 A Lesson in Contours
Turn right onto the road, pass a road on your left, then go left onto the virtual track. It's at the bottom of a rise (see the brown contour line) but you'll have to climb up it to reach the control in the corner.
25-25 Its a Chain, Gang
Another chain of decisions. Which is the faster way to the footbridge? Yes its back the way you came, because of the diagonal shape of the roads. Footbridge and maybe you use #10 as a guide. Now heres a choice: the shortest way is go right, right, left on the maintained tracks. But that involves climbing and descending a hill (see the contour?) How are your legs? It might be faster to go straight along the thin dashed track and come in to 25 from behind! Over to you.
25-Finish Home, James
Well I think you can manage this. Remember stick to tracks and green lines though.
Congratulations if you have worked through this far. There are some good lessons in this course, which was designed by Jenny Visser and Mike Fee. Explanation by Michael Wood, MTBO Coordinator for Orienteering Hutt Valley